5 LED Patterns Using Arduino Uno & 8 Leds
Description
In this project, we will create 5 different LED lighting patterns using an Arduino UNO and 8 LEDs. Each LED is connected to a separate digital pin, allowing Arduino to control different lighting sequences.
The project includes different LED effects such as sequential blinking, LEDs moving from both ends towards the center, LEDs moving from the center towards both ends, alternate LED blinking, and all LEDs blinking together. This is a beginner-friendly Arduino project to understand digital outputs, loops, and LED control.
Components Required
| Component | Quantity |
|---|---|
| Arduino UNO | 1 |
| LEDs | 8 |
| 330 Ohm Resistors | 8 |
| Breadboard | 1 |
| Jumper Wires | As required |
Circuit Diagram
Connect all 8 LEDs to the Arduino UNO through individual 330 Ohm resistors. The positive terminals of the LEDs are connected to digital pins D2 to D9 through resistors, while all negative terminals are connected to GND.
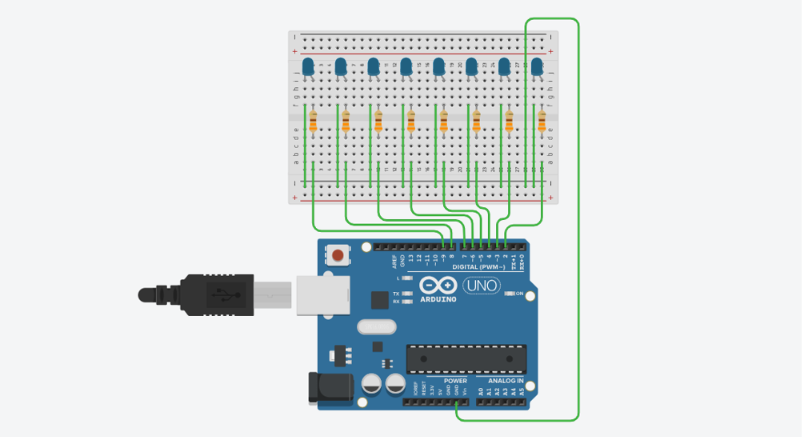
Pin Connection Table
8 LEDs → Arduino UNO
| LED | Arduino UNO Pin | Connection |
|---|---|---|
| LED 1 | D2 | Through 330 Ohm resistor |
| LED 2 | D3 | Through 330 Ohm resistor |
| LED 3 | D4 | Through 330 Ohm resistor |
| LED 4 | D5 | Through 330 Ohm resistor |
| LED 5 | D6 | Through 330 Ohm resistor |
| LED 6 | D7 | Through 330 Ohm resistor |
| LED 7 | D8 | Through 330 Ohm resistor |
| LED 8 | D9 | Through 330 Ohm resistor |
Common Ground Connection
| LED Terminal | Arduino UNO |
|---|---|
| Negative (Cathode) of all LEDs | GND |
Working Principle
Arduino UNO controls all 8 LEDs using digital output pins D2 to D9. The program uses for loops and digitalWrite() functions to turn the LEDs ON and OFF in different sequences. By changing the timing using delay(), we can create 5 different LED patterns. The entire sequence repeats continuously.
Arduino Code
// Creative Inventions
// Subscribe to my YouTube channel

const int ledPins[8] = {2, 3, 4, 5, 6, 7, 8, 9};

void setup() {

  for (int i = 0; i < 8; i++) {
    pinMode(ledPins[i], OUTPUT);
  }
}

void loop() {

  // Pattern 1: LEDs turn ON one by one
  for (int i = 0; i < 8; i++) {
    digitalWrite(ledPins[i], HIGH);
    delay(150);
    digitalWrite(ledPins[i], LOW);
  }
  delay(300);

  // Pattern 2: LEDs turn ON from both ends toward the center
  for (int i = 0; i < 4; i++) {
    digitalWrite(ledPins[i], HIGH);
    digitalWrite(ledPins[7 - i], HIGH);
    delay(200);
    digitalWrite(ledPins[i], LOW);
    digitalWrite(ledPins[7 - i], LOW);
  }
  delay(300);

  // Pattern 3: LEDs turn ON from the center toward both ends
  for (int i = 3; i >= 0; i--) {
    digitalWrite(ledPins[i], HIGH);
    digitalWrite(ledPins[7 - i], HIGH);
    delay(200);
    digitalWrite(ledPins[i], LOW);
    digitalWrite(ledPins[7 - i], LOW);
  }
  delay(300);

  // Pattern 4: Odd-position and even-position LEDs blink alternately
  for (int i = 0; i < 8; i += 2) {
    digitalWrite(ledPins[i], HIGH);
  }

  for (int i = 1; i < 8; i += 2) {
    digitalWrite(ledPins[i], LOW);
  }
  delay(400);

  for (int i = 0; i < 8; i += 2) {
    digitalWrite(ledPins[i], LOW);
  }

  for (int i = 1; i < 8; i += 2) {
    digitalWrite(ledPins[i], HIGH);
  }
  delay(400);

  // Turn all LEDs OFF
  for (int i = 0; i < 8; i++) {
    digitalWrite(ledPins[i], LOW);
  }

  // Pattern 5: All LEDs blink together
  for (int j = 0; j < 3; j++) {

    for (int i = 0; i < 8; i++) {
      digitalWrite(ledPins[i], HIGH);
    }
    delay(300);

    for (int i = 0; i < 8; i++) {
      digitalWrite(ledPins[i], LOW);
    }
    delay(300);
  }
}